Wednesday, March 31, 2010

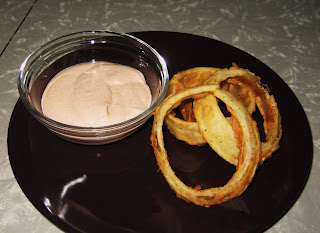
Chili's Awesome Blossom (sort of...)


While the hubby and I were discussing our menu for the week, we were trying to think of a good side dish to go with the hamburgers we planned on having tonight. Normally we have baked beans (which reminds me I really need to post that recipe cause my hubby makes a mean dish of baked beans...mmmm *licking lips*) but instead we decided to go with a recipe we had tried a while back and hadn't made in a really long time- Chili's Awesome Blossom. Now granted we don't actually make the blossom so much as we just make onion rings with the batter and dipping sauce, but they are delicious just the same.

Here's what you need:

2 yellow onions
2 1/2 cups flour
2 tsp McCormick Seasoned Salt (Season-All)
1/2 tsp black pepper
1/4 tsp garlic powder
1 cup buttermilk (If you don't have buttermilk on hand- cause I know we normally don't, just mix 1 cup regular milk with 1 Tbsp lemon juice and let sit for 5 min)
Canola oil for frying

Slice onions into rings and let them soak in cold water for at least 5 minutes. I let them soak while I made the batter. Combine dry ingredients in one large bowl and have buttermilk in a seperate bowl.

Dip onion rings a few at a time into flour mixture, then buttermilk, and then back into flour mixture. Place ring in hot canola oil and fry til golden brown. Don't try and fry too many rings at once or your oil will drop drastically in temperature and you won't get a good crispy onion ring.

To make the dipping sauce, mix all these ingredients and serve in a small dipping bowl:

1/2 cup sour cream
2 Tbsp ketchup
1/2 tsp McCormick Seasoned Salt
1/8 tsp crushed red pepper
1/4 tsp paprika

If you really want to try making the blossom, here's how. We haven't ever tried it, but be sure to let me know how it turns out:

Onion may be sliced like a blossom by cutting the top 1/4 off, the top has the stem. Then peel and be very careful to leave the root intact. Carefully slice from the top of the onion down but stop about 1/2" before you get to the root, taking care not to cut through the root. Slice the rest of the onion like a pie into many servings.

When complete soak onion in cold ice water for 1/2 hour so the onion's petals will start to open up and bloom. Drain onion and dip in flour mixture and dust well. Dip onion then in buttermilk and back in flour mixture. Place in hot oil and fry until golden. Oil should cover onion.

When done drain well and place on plate and cut center out of onion so the petals may easily be removed.


Hope you enjoy your delicious onions!

Tuesday, March 30, 2010

Sugar Cookies


I love sugar cookies!

I got this recipe from my friend Janell who is a self-proclaimed sugar cookie addict. She's tried them all, made them all and decorated them all so she knows what she's looking for in a sugar cookie. She shared this recipe with me back in December and I had the opportunity to make them again last week for a neighborhood Easter Egg Hunt. They turned out spectacular! And it is always fun to decorate them with icing and sprinkles too (although I have yet to get any cookie cutter sets of my own and keep having to borrow them from said sugar cookie addict, so I'm adding that to my wish list- just in case any of you were wondering what to get me for my birthday this year ;)

Here's what you need:

1/3 cup shortening
1/3 cup softened butter (not melted)
3/4 cup sugar
1 tsp baking powder
1/4 tsp salt
1 egg
1 Tbsp milk
1 tsp vanilla
2 cups flour

Mix shortening and butter until you get a creamy mixture. Add sugar, baking powder and salt, mix well. Beat in egg, milk and vanilla. Mix in as much flour as you can.

Divide dough in half, chill in refrigerator for 2-3 hours.

Dust table or countertop with flour and roll dough to 1/4 inch thickness. Use cookie cutter and place cookie dough shapes onto ungreased cookie sheet.

Bake at 375 for 7-8 minutes- *They will not brown if you use an airbake cookie sheet as you can see below- these have already been baked* If you don't own any airbake cookie sheets, you should go get some pronto. They are AMAZING. Nothing ever burns or sticks to them and everything is cooked evenly and perfectly.


If you're using a traditional cookie sheet they will start to brown around the edges a little bit. When that happens, pull them out right away or your cookies will be too hard and crunchy.

Cool on a wire rack and enjoy!

Friday, March 26, 2010

Chocolate Chip Cookies


I was always one of those people who bought the store bought cookie mix that you just add an egg, butter and water to. But as I was going through some old recipes I found my mom's homemade chocolate chip cookie recipe and decided to give it a shot. They turned out ok but I wanted to make the perfect cookie... It took me quite a few tries of altering the recipe here and there, but I've finally done it!!

So here it is, the perfect chocolate chip cookie- and I'm not joking when I say do it exactly as it is written. The technique in adding the ingredients, I've come to find out, is just as important as the ingredients themselves. You can use the exact same amounts of ingredients and one batch will turn out gritty, and another too runny depending on how you add them to the mix. So pay attention! ;)

What you'll need:

1/2 cup shortening
1/2 cup softened (not melted) butter (not margerine :)
3/4 cup sugar
3/4 cup brown sugar
1 tsp vanilla
1 tsp baking soda
1/2 tsp salt
1 egg
2 Tbsp milk
2 1/4 cups flour
1/2 bag of semi-sweet chocolate chips

Mix shortening, butter, sugar and brown sugar together until smooth. Add vanilla, baking soda, salt and egg and mix well. Add 1 cup of flour, mix well. Then 1 Tbsp milk, mix. Add 1 cup flour, mix. Add 1 Tbsp milk, mix. Add the last 1/4 cup flour and mix. Add chocolate chips and mix.

Drop spoonfuls of cookie dough onto an ungreased cookie sheet and bake at 375 for 10 minutes. The cookies should have just a little bit of browning on the tops. As you pull the pan out of the oven, hit the bottom of the pan on the stovetop to flatten the cookies (just a bit) and let them sit on the cookie sheet for at least 1 minute before taking them off. Cool on a wire rack and enjoy!

My husband actually prefers these to store bought (which makes me happy) and he frequently asks me to make them. I hope you enjoy them as much as we do!

Thursday, March 25, 2010

Stuffed Peppers


I hadn't ever had a stuffed pepper until just about a year ago. And let me tell you, I fell in love. I don't know what it is about it, but we have these almost every other week. I never liked spicy food growing up, and this definitely has a kick to it, but it has the perfect proportion of tomatoes, cheese, rice and bell pepper in each bite. Mmm...

What you need:

2-6 green bell peppers (depending on how many people you're making these for)
1 lb. pork chorizo
1/2 cup onion, diced
4 cloves garlic
1 can tomatoes
1 Tbsp Worcestershire sauce
1/2 - 1 cup cooked white rice (depending on how many peppers you have to stuff- I'll explain later)
1 cup cheese

Cut the tops off the peppers and clean out the insides (remove seeds and white rinds on sides while keeping the pepper whole like a bowl) Boil peppers in water for around 15 minutes and set aside in a casserole dish.

While the peppers are boiling, brown chorizo. If you are using chorizo that has a casing, remove it before cooking it. You want it to be more like ground meat. We've found a very cheap chorizo brand at Walmart that is usually under $1 and doesn't have a casing. It is more like a spicy paste than a sausage. It comes in a plastic wrap with a green, red and white label. (Sorry for not having a picture- you'll know what I'm talking about when you see it though.) All you have to do is cut open one end and squeeze the chorizo out onto the pan. It doesn't "brown" when you cook it, so if you use that kind, don't worry about browning it first.

Add onions and garlic to skillet and cook until onions are soft. Season with a little salt and pepper. Stir in tomatoes, Worc. sauce and rice. Since there's usually only 2 of us, we only use about a 1/2 cup of rice so we don't have too much filling. But if you're making 4 or more peppers, use at least 1 cup of rice (you can add as much as you'd like to make more filling). Remove from heat and mix in cheese.

Stuff peppers and top with extra cheese. Cover with foil and bake for 30 minutes at 350 degrees.

Serve with a little bit of sour cream and sprinkle a little lime juice on and enjoy!

*An alternate recipe for those with children or who don't like too much spice:
Only use 1/2 - 1/4 of the chorizo (or none at all if you don't want it) and use 1 lb. ground beef. Just brown the beef, drain grease and then start adding the other ingredients as called for above.

This recipe will stuff about 4 medium sized peppers, so if there's only 2 of you, save the extra mixture and use it with some refried beans to make a great burrito.

Delicious!

Friday, March 12, 2010

Sweet and Sour Green Beans


The first Thanksgiving I had with my husband's side of the family they had the traditional green bean casserole. You know, the one with the cream of mushroom soup and crispy onions on top? Well I've gotta admit, I don't remember my family ever making those green beans growing up, so I wondered, "How traditional is this casserole?" At our house it was always my grandma's sweet and sour green beans. I've made it a few times for my husband's family (one of those times being last Thanksgiving which we celebrated at our house) and they all seemed to enjoy it.

So thanks Meme for always making such delicious green beans and for passing along the recipe.

Why are they so delicious you may ask? Well what if I told you there was 8 strips of bacon and a lot of sugar? hehehehe.... Cause we all know that bacon makes everything taste that much better!!

Here's what you need:

3 cans of french style green beans
1 medium onion cut into thin rings
8 bacon strips (or the whole package if you really feel like it. I know I usually do ;)
1/2 cup slivered almonds
6 Tbsp sugar
6 Tbsp apple cider vinegar

*YOU MUST DO THIS THE NIGHT BEFORE YOU PLAN ON SERVING THIS DISH*

Drain beans and place in a 13x9 casserole dish. Place onion rings over beans. Cook bacon and set aside. (Leaving the grease in the pan) Crumble the bacon and sprinkle it and the almonds over the beans. Cook sugar and vinegar in bacon grease until dissolved. Pour over beans.

Cover and refrigerate overnight. Bake at 350 for 40 minutes and enjoy!!

Thursday, March 11, 2010

Fajitas


My grandparents gave us a TON of elk meat a few months ago and we're still not done using it all. Basically we've been substituting any beef for this deliciousness and we've found some pretty creative ways to do it. (Once again, I apologize for my lack of photography skills. It tastes a whole lot better than it looks. Elk meat also looks a little darker than beef steaks would)

We decided to make fajitas with some of the steak we had, and they turned out pretty good! The best part is that this marinade can be used with pretty much any meat. So if you're on a budget and can't afford steaks, chicken will go perfectly with this.

Marinade:
1/4 cup lime juice
1/3 cup water
2 Tbsp olive oil
4 cloves minced garlic
2 tsp soy sace
1 tsp salt
1/2 tsp liquid smoke flavoring
1/2 tsp cayenne pepper
1/2 tsp ground black pepper

You'll also need a bell pepper and an onion.

To get the most flavor into the meat, slice it up into the size of chunks you'd like BEFORE you marinade them. Let them soak in the marinade at least 3 hours (even better if you let it soak overnight).

Saute the meat in a pan on med-high heat. In a seperate pan, saute slices of bell pepper and onions.

Serve on warm flour tortillas with sour cream and/or any other toppings you'd like. (cheese, tomatoes, avacado, salsa, etc.)

All in all, this is a pretty quick recipe. Just make the marinade the night before and all you have to do is toss the meat and veggies in a hot pan, and a few minutes later you have a delicious dinner.

Happy Eating!

Wednesday, March 10, 2010

Banana Bread

At our house we call banana bread, "banana cake." It really is more like cake anyway, am I right? This is a great way to use up all the bananas that you didn't eat before they turned too brown and mushy. Here's a great recipe that always turns out perfectly-

2 cups flour
1 1/2 tsp baking powder
1/2 tsp baking soda
1/4 tsp salt
1/4 tsp cinnamon
2 eggs
3-4 ripened bananas
1 cup sugar
1/2 cup vegetable oil

In a large bowl, combine flour, baking powder, baking soda and salt. Make a well in the center of the mix. Set aside.


Here's about how ripe the bananas should be (maybe a little less... these were on the verge of being too ripe)

In a different bowl, mash up bananas. I always use a potato masher cause it works perfectly.


Add eggs, oil and sugar. Mix well. Add this mixture all at once to the flour mixture.


Mix well, but the batter should still be lumpy.

Pour into one greased 9 x 5 x 3 inch or two greased 7 1/2 x 3 1/2 x 2 inch bread pans.

If using the 9 inch pan, bake at 350 for 45 min, then cover in foil and bake for 15 more minutes.

If using the 7 1/2 inch pans, bake at 350 for 30 min, then cover in foil and bake for 15 more minutes.


Remove from pan and let cool on a wire rack.

Yummy!! I hope you enjoy this "cake" as much as our family does!

Tuesday, March 9, 2010

Oreo Truffles

Ok so this dessert is FAN-FREAKIN-TASTIC!! But it's also so rich that I can't eat more than 2 at any time. (And for me, that's saying something!) I got this from a friend who got it from Bakerella. Click here for the original recipe.

Here's what you'll need:

1 package oreo cookies (divided… use cookie including the cream center)
1 8oz. package cream cheese (softened)
white chocolate bark- if you don't know what I'm talking about, it's this stuff.

Finely crush 7 cookies in a food processor or place them in a ziploc bag and crush into a fine consistency. Set aside for later.

Crush remaining cookies (yes, the whole package of Oreos) and stir in softened cream cheese. I started to do this with a wooden spoon and gave up. For your sake, use an electric mixer.

Roll the mixture into 1″ balls and place on wax paper covered cookie sheet.

Melt chocolate as directed on the package and then dip balls into chocolate, tap off extra and set aside on wax paper covered cookie sheet to dry. Stick them in the fridge for a few minutes and then do a second coating of the chocolate.

Sprinkle the tops with the 7 crushed cookies for decoration.


Refrigerate for a few minutes, grab a large glass of milk and enjoy!

Makes about 36 truffles.

Sidenotes: These are also good dipped in regular milk chocolate bark. And for an extra twist, use mint Oreos.

Monday, March 8, 2010

Taco Soup


I'm not the biggest fan of winter... so when it gets cold I love to have soup. This taco soup is so flavorful and not only warms me up when I'm cold, it gets me excited about my favorite season- SUMMER!!

Here's what you need:

1 onion, chopped
3 cloves garlic, minced
1 Tb olive oil
2 tsp chili powder
1 tsp dried oregano
1/4 tsp cayenne pepper
1 can tomatoes
1 can chicken broth
1 1/4 cups water
1 can of corn
1 can of black beans, rinsed and drained
1 can chopped green chiles
2 boneless chicken breasts, cooked and cut into bite-sized pieces
crushed tortilla chips
shredded Monterey Jack cheese
1 avacado, sliced
sour cream

In a medium pot, heat oil over medium heat. Saute onion and garlic in oil until soft. Stir in chili powder, oregano, tomatoes, broth, and water. Bring to a boil, and simmer for 5 to 10 minutes.

Stir in corn, chiles, beans and chicken. Add salt and pepper to taste if desired.
Simmer for 10 minutes.

Pour soup into bowls and top with crushed tortilla chips, cheese, sour cream and avacado slices.

Saturday, March 6, 2010

Crockpot Pulled Pork


My husband and I LOVE barbeque. So after trying a few places around town and thinking, "Well, that was ok, but not worth how much we paid for it..." we decided to make pulled pork ourselves.

This recipe is SO easy. It's perfect for letting the roast cook while you're at work and then will be ready about an hour after you get home.

What you'll need:

Either a Boston Butt or Picnic pork roast- (these two "shred" the easiest.)
1 small-medium yellow onion sliced into large chunks
1 1/4 cup water- it really doesn't matter how big your roast is. As long as it fits in your crock pot, always use the same amount of water.
salt
pepper
BBQ sauce
hamburger buns

Salt and pepper the outside of the roast (usually just a light even coat on both sides). Place roast and onion chunks in crock pot with water and cook on low for 6-8 hours. Drain liquid and take out onions. Shred pork and add about 1 cup BBQ sauce (this really isn't exact, I just keep adding til I think it's enough) Cook on low for at least 1 hour. Stir it up every 20 minutes to make sure it isn't burning or sticking to the bottom too much.

Serve on a bun with some extra sauce and enjoy!

You can use any kind of BBQ sauce, but after trying several different brands and varieties we've decided that we like Sweet Baby Rays Original the best. We bought 2/40 oz bottles at Costco for only $5. (The smaller bottles are usually around $3 at the grocery store so this was a STEAL!)

Friday, March 5, 2010

Mini Cheesecakes


I LOVE cheesecake. (As if you couldn't tell from the pictures on the sidebar and at the top...hehe) So this recipe is one of my absolute favorites- mini cheesecakes! These little cups of pure bliss are perfect for parties (bridals showers, baby showers, parties by yourself for absolutely no reason... is it just me who does that?) The best part is that if you get stressed out like I do before a big party, you can make these the night before and leave them in the fridge until party time!

What you'll need:

2 8oz packages of cream cheese (like I've said before, if you're making something sweet, I swear Philadelphia tastes better)
1/2 cup sugar
1/2 tsp vanilla
2 eggs
12 Oreos

Beat cream cheese, sugar and vanilla with an electric mixer on medium speed until everything is well blended. Add eggs, one at a time, beating on low speed after each addition just until blended.

*CAUTION!* When you're making cheesecake, don't overbeat the mixture. It causes too many air bubbles in the mix and after it cools off the middle will sink- a lot. So just mix until everything is blended and then STOP. :)

Place 1 Oreo in the bottom of each muffin cup. Seriously, that's it for the crust! (Told you it was easy!) Fill each cup evenly with batter.

Bake at 350 degrees for 20 minutes or until the centers are almost set. Cool. Refrigerate 3 hours or overnight.

For a topping, I used whipped cream and blueberries. In the summer there are all kinds of fresh fruit you can top these with and it would taste amazing. Do whatever you want! For all those times when fresh fruit is out of season, just buy your favorite can of pie filling and add a spoonful to each one. Or you can just enjoy these without topping cause no matter what, they taste great.

So sit down and enjoy one (or 7) of these delicious mini-cheesecakes. :)

Thursday, March 4, 2010

Cafe Rio style Enchiladas

For anyone who hasn't ever tasted the awesomeness that is Cafe Rio's sweet pork, you are truly missing out on a life-altering experience.

The only problem is having to wait in line to get it... I once called a TAKE-OUT order at 5:00 on a Friday night and was told to pick up my burrito at 7:30!! But it was SO worth it that I waited.

I'm not claiming this recipe is exactly the same- but it's pretty darn close:


2 pounds pork
2 cans Coke (NOT diet)
1/4 c. brown sugar
dash garlic salt
1/4 c. water
1 can green chilies
3/4 can green enchilada sauce
1 c. brown sugar

Put the pork in a ziploc bag to marinade. Add 1 can of coke and 1/4 c. of brown sugar. Marinade for a few hours or overnight.

Drain marinade and put pork, 1/2 can of coke, water, and garlic salt in crock pot on high for about 3-4 hours (or until it shreds easily, but don't let it get TOO dry) or on low for 8 hours. Remove pork from crock pot and drain any liquid left in the pot. Shred pork.

In a food processor or blender, blend 1/2 can Coke, chilies, enchilada sauce and 1 c. brown sugar. If it looks too thick, add more Coke little by little.

Put shredded pork and sauce in crockpot and cook on low for 2 hours.

Add shredded pork and cheese to taste to tortillas and roll into burritos. Pour any remaining enchilada sauce on top and add cheese. Bake at 350 for 15-20 minutes.

Just a sidenote, I have decided that using a mild enchilada sauce makes the enchiladas seem too sweet. I suggest using something medium or spicier, depending on your preference for spice. This will make at least 4 decent sized burritos, and are great as leftovers!

Enjoy!

Wednesday, March 3, 2010

Jambalaya

(This was originally from my regular blog, but for the sake of time I just copied and pasted)

Last night I made jambalaya for the first time. And it turned out SO good! I was actually quite impressed with myself (hehehe) which is why I decided to post it on here for you all to enjoy as well. Seriously, you HAVE to try this!

It started out as an adventure- McKenzie and I walked to the grocery store just to pick up a few items that I needed, one of which being the Andouille sausage that is called for in the recipe. After walking all the way there and searching high and low for it, I decided to ring the service bell at the meat counter.

Butcher guy- "Hello, how can I help you?"
Me- "Do you carry Andouille sausage?"
Butcher guy- "Uh.... If we did it'd be over by the breakfast sausages."
Me- "Well this isn't a breakfast sausage. It's kind of like keilbasa, but... not."
(We walk over together to look at all the sausages)
Butcher guy (after slightly glancing in the general direction of the sausages)- "I don't think we carry that brand."
Me- "Andouille isn't a brand, it's a type of sausage."
Butcher guy- "Hmm...I don't think we carry it."
Me- "Uh... ok. Thanks anyway."

In all honesty I think the butcher guy had NO idea what Andouille is. I've never bought it before so I just didn't know exactly where to look. After searching all the different kind of sausages I decided to just get Keilbasa and call it a day. I grabbed the "spicy" variety and almost walked away when I noticed it had expired last week- gross! I put it down and searched thru all 20 or so of the same kind only to find out that they were ALL expired. (It's a smaller grocery store that we usually only go to if we need one or two things and need it quick. And this has actually happened a few times before...) I was disappointed and grabbed a "smoky" keilbasa instead (not expired), hoping that it wouldn't ruin the flavor of the jambalaya.

As I got ready to start making it, I realized I forgot to buy an onion. *doh!* But luckily we had half of one from a few days ago still in the fridge and I only needed half or 1/4 anyway, so it all worked out in the end. :)

Ok- so here's where the recipe begins. Micah found this on Food Network's website and it comes from the King of Cajan himself, Emeril Lagasse.


Ingredients-

1 chicken breast, diced
1 Tb Creole seasoning (recipe will follow)
2 Tb olive oil
1/4 cup chopped onion
1/4 chopped green bell pepper
2 Tb chopped garlic
1/2 can diced tomatoes
2 bay leaves
1 tsp Worcestershire sauce
3/4 cup rice
3 cups chicken stock
5 oz keilbasa sliced (about 1/3 the package)

Creole seasoning (I made just enough to get to the 1 Tb called for in this recipe. If you want to make a bigger batch and save some for later, click on the link at the bottom to see Emeril's bigger batch recipe)

1/4 tsp black pepper
1/4 tsp onion powder
1/4 tsp cayenne pepper
1/4 tsp oregano
1/4 tsp thyme
1/2 tsp garlic powder
1/2 tsp salt
3/4 tsp paprika

Combine all ingredients thoroughly

Directions-

In a bowl, combine chicken and Creole seasoning and mix well. Set aside.

In a large saucepan heat oil over high heat with onion and bell pepper, 3 min. Add garlic, tomatoes, bay leaves and Worcestershire sauce. Mix well. Stir in rice and slowly add chicken stock. Reduce heat to medium and cook until rice absorbs liquid and becomes tender, stirring occasionally, about 15 min. (I covered mine with a lid and that seemed to help get the rice to cook through a little better)

While the rice mixture is cooking, start cooking the diced chicken over medium heat. Once it looks about done, toss it and the sliced sausage into the rice mixture. Let it cook until the rice is done and most the liquid is gone. (About 7-10 minutes)

Add salt and pepper to taste and BAM! (Sorry, couldn't help myself. I get all excited about Emeril...hehehe.)


Oh yeah, and this is for about 3-4 people.


This is the way we made it, but the original recipe calls for a few extra ingredients that we decided not to use (shrimp, hot sauce, celery). You can either try our way or click here for his original. (There are also like a million different jambalaya recipes by him alone, this is just the one we thought sounded best.)

All in all, I 'd say this was perfect. I actually enjoyed the smokiness of the keilbasa and will probably just use that next time anyway instead of fussing about the Andouille. This had just enough kick for us, but if you're adventurous you should try the hot sauce, add extra Creole seasoning, and maybe you can get your hands on some Andouille sausage...haha

Tuesday, March 2, 2010

Fruit Pizza

This is one I've gotten a few requests for, so I figured it should be my first post.

I made this last year for my father-in-law's birthday (and since it turned out to be so delicious, my birthday as well!)


1 package (20 oz) refrigerated sliceable sugar cookie dough, sliced.

1 package (8 oz) cream cheese, softened. (I used Philadelphia cause I swear it works better for "sweet" things)

1/4 cup sugar

1/2 teaspoon vanilla

Fruit- I used kiwi, strawberries, blueberries and mandarin oranges. I think pineapples, bananas, and raspberries would work great as well.

1/4 apricot preserves (I used apricot pineapple cause that's what I had at the time), pressed thru sieve to remove lumps

1 tablespoon water.

Preheat oven to 375. Line a pizza pan with foil; spray with cooking spray, press cookie slices together to make a "pizza" crust. Bake 14 min and cool. Invert onto serving plate; carefully remove foil.

Beat cream cheese, sugar and vanilla with mixer on medium until well blended. Spred over crust. (I actually put a little spoonful of the preserves in the cream cheese part to make it more fruity)

Arrange fruit over cream cheese layer. Mix the preserves with water (enough to make it about the same texture as maple syrup) and brush/drizzle over fruit. Refrigerate 2 hours.

Enjoy!!

Welcome!!

I feel like such a copycat... a few of my friends have started food blogs and I decided to follow suit. I hope this way I can share many wonderful recipes that I've tried/created and you can enjoy some delicious food.

I hope I'll be able to make the food look as good as it tastes through pictures (because I always love pictures of the recipes I'm going to try), but I can't guarantee any fabulous photos. I'm just not blessed with the photography gene. *sigh*

I would LOVE to hear from you as to what you think of the recipes after you've tried them, so be sure to leave plenty of comments!